- 7 Màu
- about
- Ajax
- ảnh
- Ảnh b tháng 4
- Ảnh Bìa
- Ảnh bìa ca sĩ
- Ảnh bìa Facebook
- Ảnh bìa gái đẹp
- Ảnh bìa giáng sinh
- ảnh bìa liên minh huyền thoại
- Ảnh bìa năm mới
- Ảnh bìa tháng 10
- Ảnh bìa tháng 11
- Ảnh bìa tháng 12
- Ảnh bìa tháng 4
- Ảnh bìa tháng 8
- Ảnh bìa tháng 9
- Ảnh chế
- Ảnh chibi
- Ảnh Đẹp
- Ảnh động
- asp.net core
- ASP.NET Core Identity
- asp.net mvc
- backend
- Blogger Templates
- blogspot
- Brush
- Cafe Code
- Christmas
- Chữ nghệ thuật
- Chúc mừng năm mới
- Chuyện tình bác sĩ
- Cô Đơn
- Code
- css
- Dame
- Double Exposure
- Download
- Ebook
- EPPlus
- Faq
- File 3D
- flutter
- Font chữ
- Font chữ việt hóa
- frontend
- Fshare.vn
- Giáng sinh
- Hacker
- Hacking
- Halloween
- Hiệu ứng chữ
- Hình nền máy tính
- học javascript
- Hot Girl
- HTML - CSS - ?
- html/css
- Hướng dẫn cover ảnh bìa
- Hướng dẫn Photoshop
- javascript
- javascript dom
- Khung ảnh bìa
- Khung Hình
- Kĩ năng seo
- lập trình asp.net
- lập trình mobile
- Logo
- Mặt Nạ
- Mockup
- ngày nhà giáo Việt Nam
- Ngày phụ nữ
- Noel
- Phần Mềm
- Phiêu Lưu
- Phím tắt
- Photoshop
- PNG
- Pokémon
- PSD
- PSD 3D Text
- PSD ảnh bìa
- psd đường một chiều
- Seo
- service
- Soái Ca
- Sơn Tùng M-TP
- source code
- Stock Ảnh
- Sự kiện Blogger
- Tâm Trạng
- tản mạn
- Tất cả bài viết
- template
- template chuẩn seo
- templates đẹp
- Tết
- Tết trung thu
- Text Effect
- Thầy cô
- Thủ Thuật
- Thủ thuật Blogger
- Thủ thuật Facebook
- Thủ thuật Photoshop
- Tiện ích Blogger
- Tìm hiểu về Photoshop
- Tình Yêu
- Tutorial
- Typo
- Typography
- ui ux design
- Valentine
- Vector
- Video


#4 Xuất dữ liệu trong bảng ra file Excel trong ASP.NET Core MVC
Hôm nay, mình sẽ giới thiệu các bạn bạn một chức năng khá hay khi xử lý với các bảng, đó là xuất tất cả dữ liệu trong bảng ra file Excel.
Các bước thực hiện rất đơn giản, không mất quá nhiều thời gian nên hãy cùng làm theo và nghiên cứu về nó.
Bước 3: Hiển thị nút download trong View/Doctors/Index.cshtml với code sau:
Và các bạn có thể code sau dùng để tạo các phần header:
Và phần đổ dữ liệu vào:
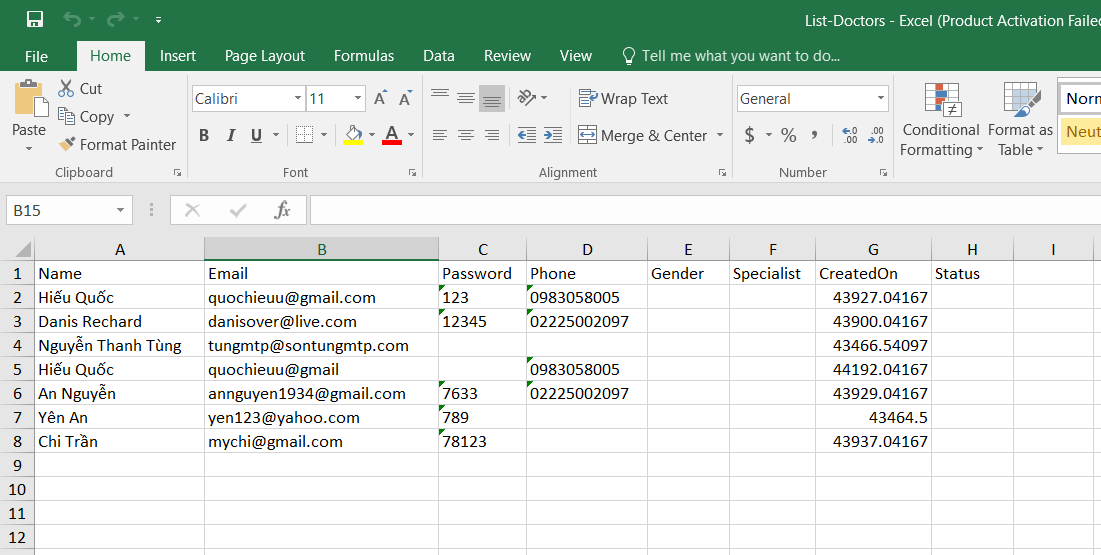
Các bạn có thể đổi tên file khi download trong fileDownloadName: "List-Doctors.xlsx".
Tiến hành
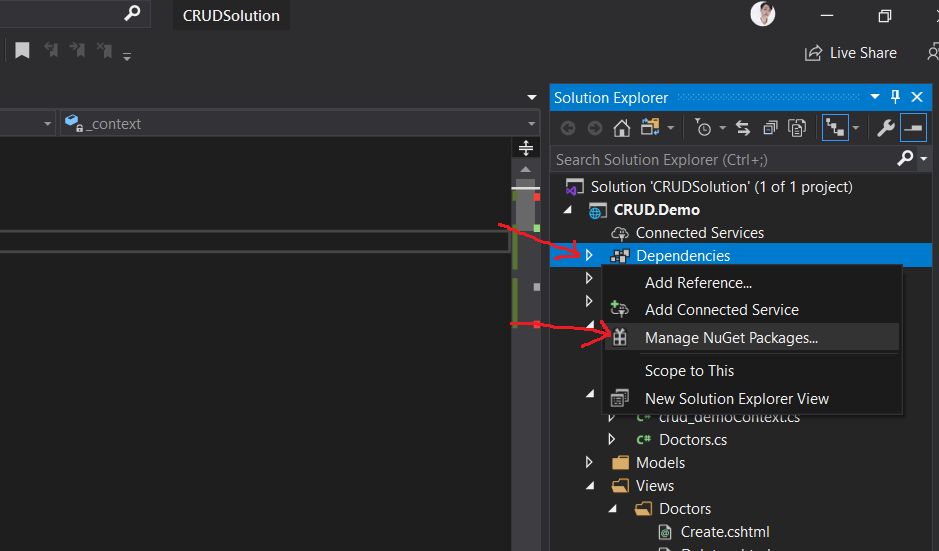
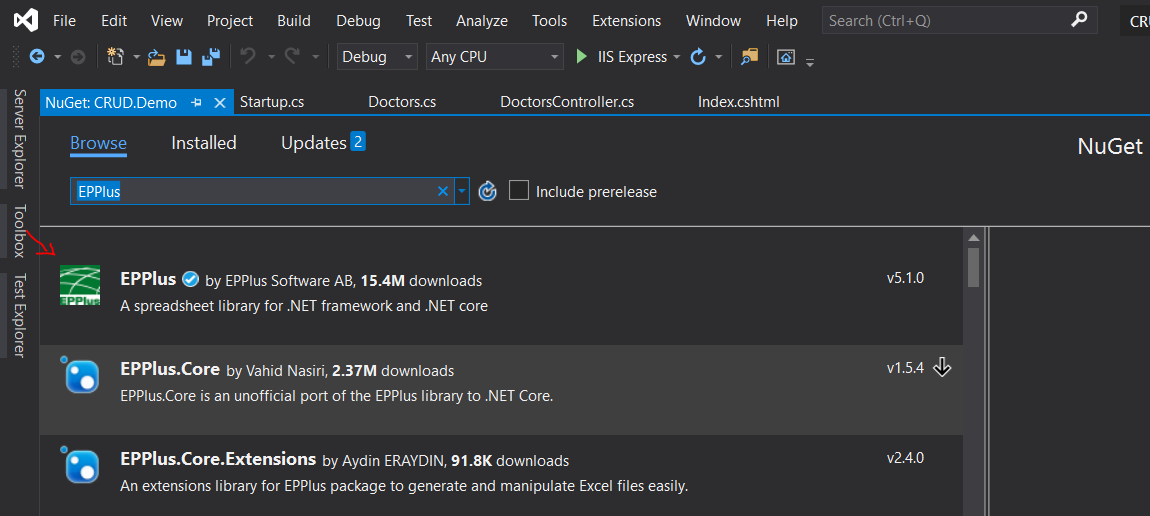
Bước 1: Cài đặt NuGet Package tên là EPPlus, như hình dưới:
Bước 2: Trong Controllers/DoctorsController.cs thêm mới phương thức sau:
public IActionResult ExportToExcel()
        {
            var doctors = from m in _context.Doctors
                          select m;

            byte[] fileContents;
            ExcelPackage.LicenseContext = LicenseContext.NonCommercial;
            ExcelPackage Ep = new ExcelPackage();
            ExcelWorksheet Sheet = Ep.Workbook.Worksheets.Add("DoctorsInfo");
            Sheet.Cells["A1"].Value = "Name";
            Sheet.Cells["B1"].Value = "Email";
            Sheet.Cells["C1"].Value = "Password";
            Sheet.Cells["D1"].Value = "Phone";
            Sheet.Cells["E1"].Value = "Gender";
            Sheet.Cells["F1"].Value = "Specialist";
            Sheet.Cells["G1"].Value = "CreatedOn";
            Sheet.Cells["H1"].Value = "Status";

            int row = 2;
            foreach (var item in doctors)
            {
                Sheet.Cells[string.Format("A{0}", row)].Value = item.Name;
                Sheet.Cells[string.Format("B{0}", row)].Value = item.Email;
                Sheet.Cells[string.Format("C{0}", row)].Value = item.Password;
                Sheet.Cells[string.Format("D{0}", row)].Value = item.Phone;
                Sheet.Cells[string.Format("E{0}", row)].Value = item.Gender;
                Sheet.Cells[string.Format("F{0}", row)].Value = item.Specialist;
                Sheet.Cells[string.Format("G{0}", row)].Value = item.CreatedOn;
                Sheet.Cells[string.Format("H{0}", row)].Value = item.Status;
                row++;
            }


            Sheet.Cells["A:AZ"].AutoFitColumns();
            Response.Clear();
            Response.ContentType = "application/vnd.openxmlformats-officedocument.spreadsheetml.sheet";
            fileContents = Ep.GetAsByteArray();

            if (fileContents == null || fileContents.Length == 0)
            {
                return NotFound();
            }

            return File(
                fileContents: fileContents,
                contentType: "application/vnd.openxmlformats-officedocument.spreadsheetml.sheet",
                fileDownloadName: "List-Doctors.xlsx"
            );
        }
Bước 3: Hiển thị nút download trong View/Doctors/Index.cshtml với code sau:
<div class="text-right" style="overflow: hidden; padding: 1px 0px 0px 0px; margin-top: -47px; margin-bottom: 10px;">
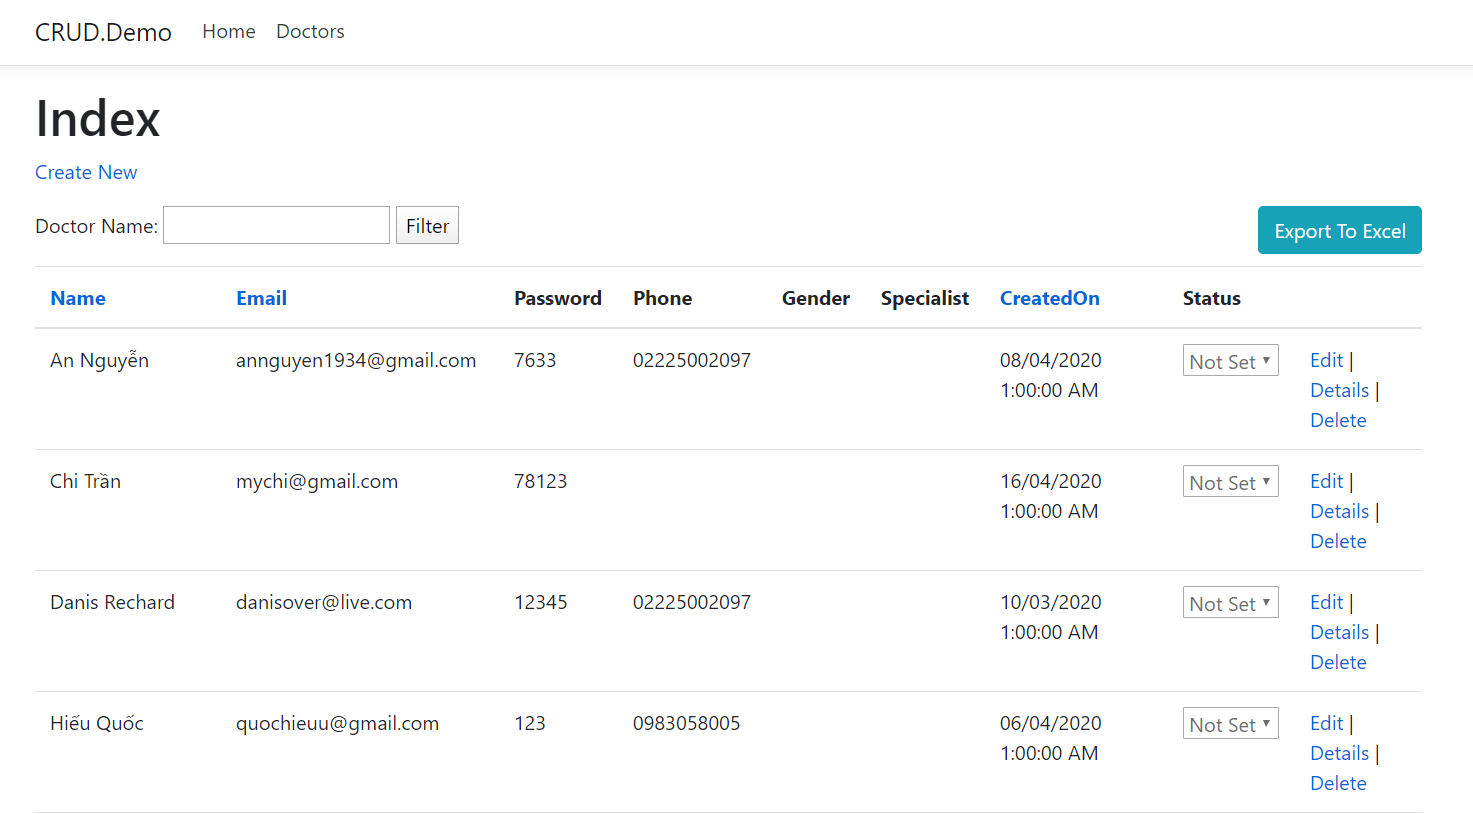
    <button type="button" class="btn btn-info" onclick="location.href='@Url.Action("ExportToExcel", "Doctors")'">Export To Excel</button>
</div>
Giải thích
Bạn có thể xóa dòng này và chạy thử, vì trong một số trường hợp nó yêu cầu bạn phải có License:
ExcelPackage.LicenseContext = LicenseContext.NonCommercial;Và các bạn có thể code sau dùng để tạo các phần header:
Sheet.Cells["A1"].Value = "Name";
Sheet.Cells["B1"].Value = "Email";
Sheet.Cells["C1"].Value = "Password";
Sheet.Cells["D1"].Value = "Phone";
Sheet.Cells["E1"].Value = "Gender";
Sheet.Cells["F1"].Value = "Specialist";
Sheet.Cells["G1"].Value = "CreatedOn";
Sheet.Cells["H1"].Value = "Status";
Và phần đổ dữ liệu vào:
Sheet.Cells[string.Format("A{0}", row)].Value = item.Name;
Sheet.Cells[string.Format("B{0}", row)].Value = item.Email;
Sheet.Cells[string.Format("C{0}", row)].Value = item.Password;
Sheet.Cells[string.Format("D{0}", row)].Value = item.Phone;
Sheet.Cells[string.Format("E{0}", row)].Value = item.Gender;
Sheet.Cells[string.Format("F{0}", row)].Value = item.Specialist;
Sheet.Cells[string.Format("G{0}", row)].Value = item.CreatedOn;
Sheet.Cells[string.Format("H{0}", row)].Value = item.Status;
Các bạn có thể đổi tên file khi download trong fileDownloadName: "List-Doctors.xlsx".
Kết quả
Sau khi debug, nút Export To Excel đã hiển thị:
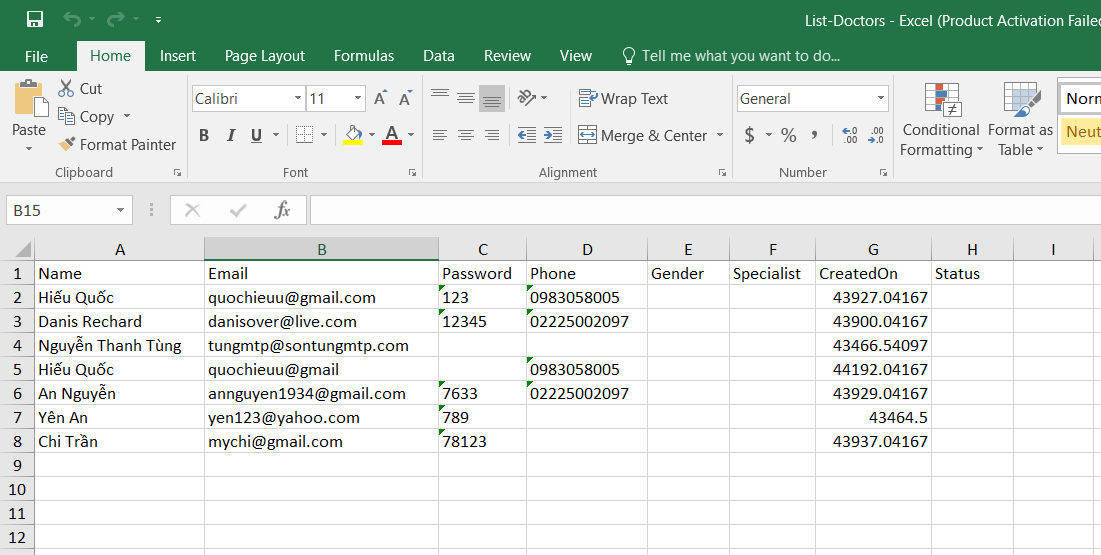
Và khi download về nó sẽ như sau:
Lời kết
Thành phẩm trên, trông hơi cùi bắp và khá chuối phải không =))). Ở các bài viết tiếp theo, mình sẽ hướng dẫn các bạn format file excel sao cho đẹp mắt hơn, cũng như là 1 series riêng chỉ nói về EPPlus. Hãy cùng theo dõi blog mình nhé.
Mong bài viết có ích, chúc các bạn thành công.
By Hiếu Quốc
Có lẽ bạn thích?
1 comment
Danh Mục
Blog Bạn Bè
Comments
Địa chỉ
52 Xô Viết Nghệ Tĩnh, Hải Châu, Đà Nẵng


error CS0246: The type or namespace name 'ExcelWorksheet' co
ReplyDeleteuld not be found (are you missing a using directive or an assembly reference?) sai đoạn này anh ạ