

Học lập trình ASP.NET MVC cơ bản qua bài tập cụ thể

Chào các bạn, hôm nay chúng ta sẽ cùng luyện tập lập trình ASP.NET MVC qua một số bài tập cụ thể để các bạn rèn luyện và hiểu nhiều hơn về ASP.NET MVC. Bài viết này, mình sẽ chú tâm nhiều hơn về cách code CRUD và các nghiệp vụ xung quanh nó. 


Với view sau (Views/Customers/Index.cshtml):
Và view của trang details như sau (Views/Customers/Details.cshtml):
Tương ứng với view sau (Views/Customers/Create.cshtml):
Tương ứng với view sau (Views/Customers/Edit.cshtml):
Tương ứng với view sau (Views/Customers/Delete.cshtml):
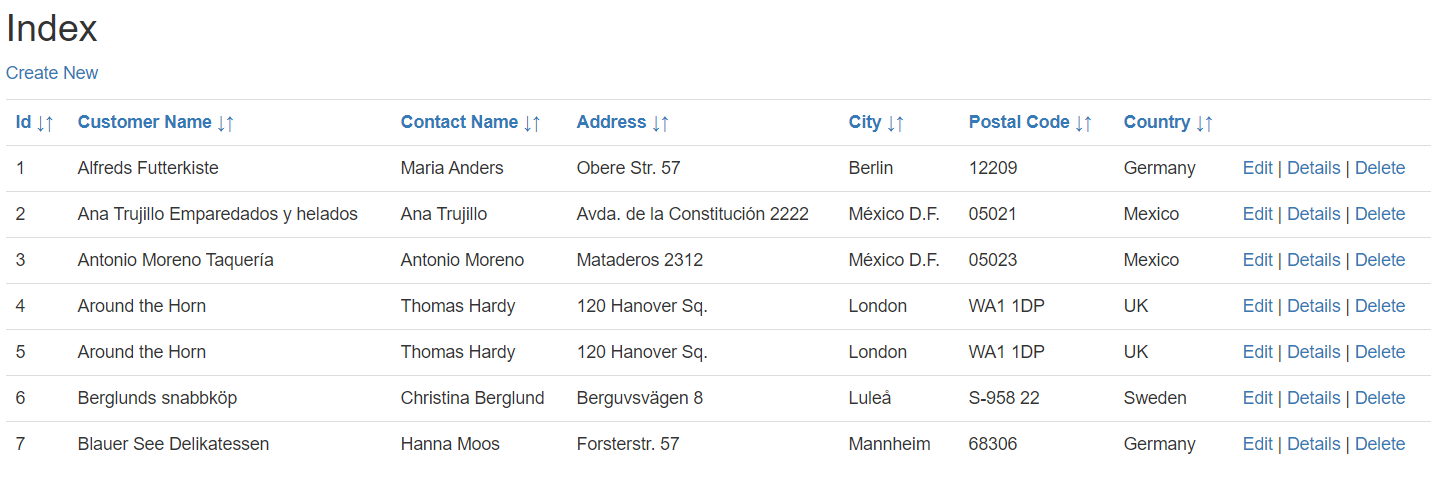
Hoàn tất! Bây giờ hãy Build lại solution và chạy project để xem kết quả nhé:
Phương thức trên nhận vào một tham số sortOrder từ chuỗi truy vấn trong URL, và giá trị mặc định là sắp xếp tăng dẫn theo Id. Ta kết hợp dùng switch.. case.., để khi ta nhấn vào liên kết tiêu đề cột, giá trị sortOrder sẽ sắp xếp phù hợp.

Và view của index được chỉnh sửa như sau:
Phần code được update sẽ được tô màu, và ở phần view bạn cần chú ý các form bắt buộc phải nằm ngoài thẻ table, và các form không được lồng vào nhau.

Và view tương ứng trong index cũng được chỉnh sửa như sau:


Đề bài
Tạo thực thể Customer(Id, CustomerName, ContactName, Address, City, PostalCode, Country) trong cơ sở dữ liệu, kết nối đến project ASP.NET MVC và thực hiện:
- Thực thi CRUD với thực thể Customer.
- Sắp xếp (sorting) dữ liệu trong bảng theo tất cả các trường trong bảng (Id, CustomerName, ContactName, Address, City, PostalCode, Country).
- Tìm kiếm dữ liệu theo Id, CustomerName.
- Tìm max, min theo Id.
- Xuất dữ liệu trong bảng ra file Excel.
Tạo database
Trước tiên bạn cần tạo database với thực thể như đề bài trên, và thêm dữ liệu mẫu vào bảng.

Mình đã code mẫu một database với thực thể Customer, và dữ liệu mẫu, các bạn có thể tải về để tham khảo hoặc thực thi theo link sau:
Tạo project ASP.NET MVC
Bước 1: Tạo hai project mới sau trong solution:
- CustomerManagement.Data (Class Library (.NET Framework))
- CustomerManagement.WebApp (ASP.NET Web Application (.NET Framework))
Bước 2: Trong CustomerManagement.Data tạo mới thư mục Entities và kết nối database code first:
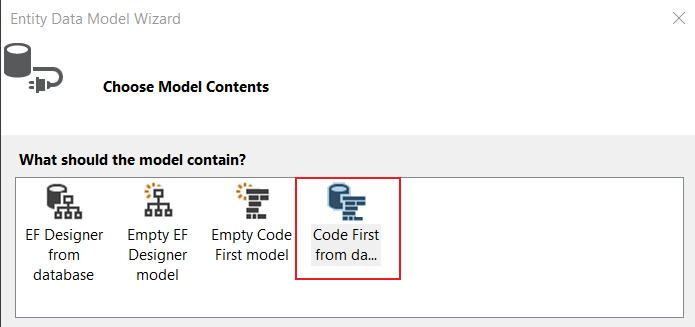
- Thêm new item với ADO.NET Entity Data Model và đặt tên là DataDbContext

- Chọn model contents là Code First from database

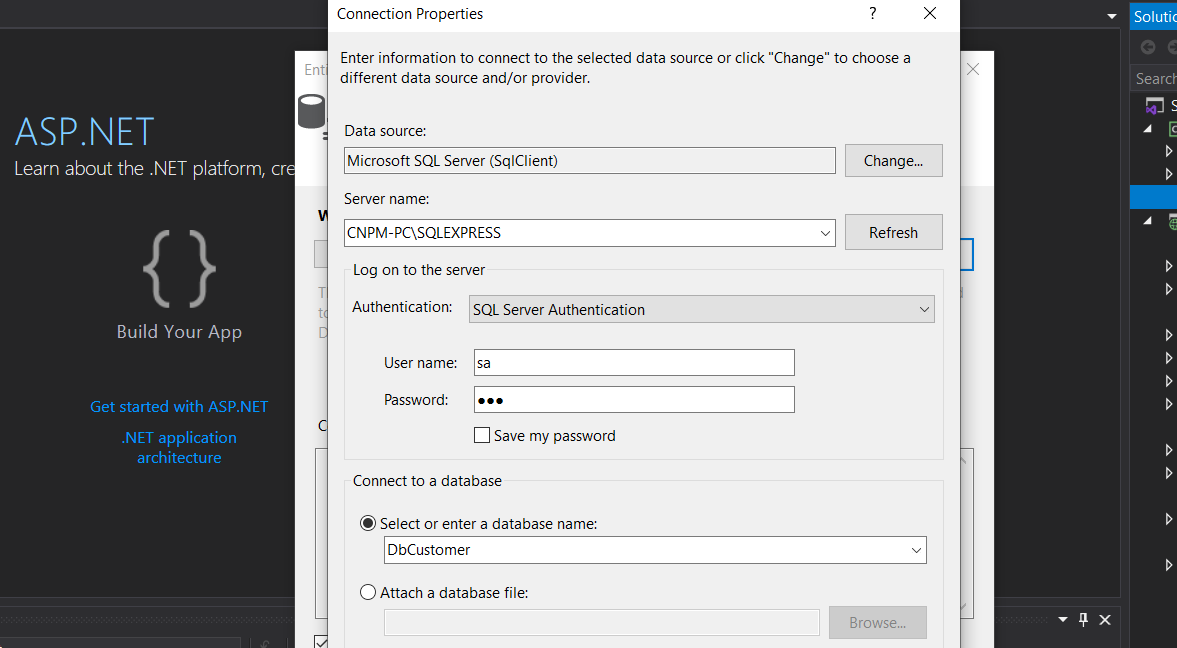
- Tiếp theo kết nối với data phù hợp trong form
- Tiếp theo chọn Yes, include the sensitive data in the connection string.
- Cuối cùng chọn database object là Tables.
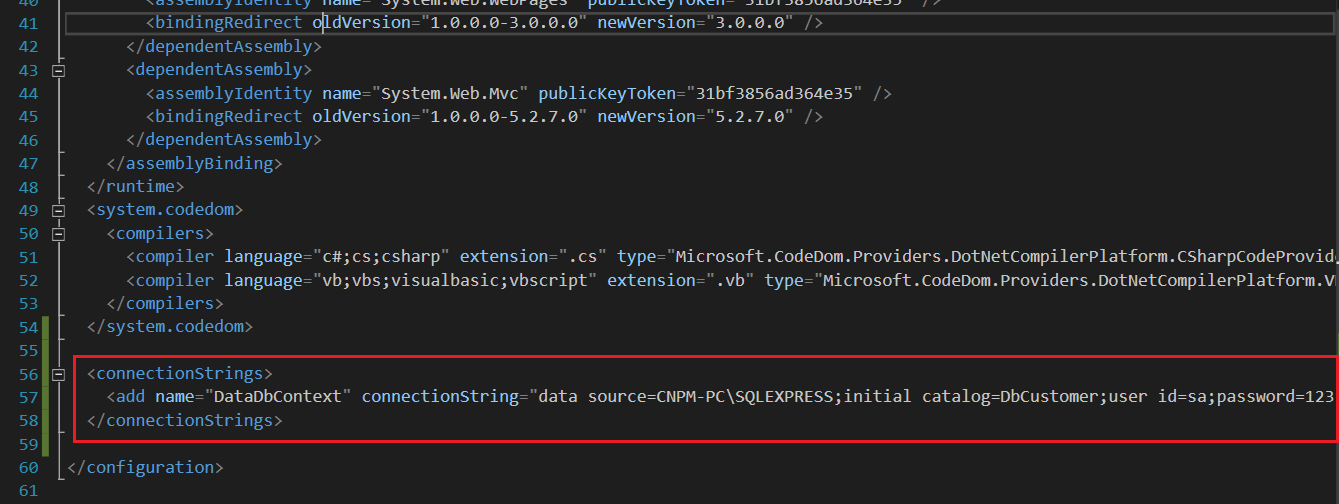
Bước 3: Thêm connectionString từ App.config sang Web.config:
Trong App.config các bạn sẽ thấy connection string như sau:

Bạn copy đoạn code như hình trên rồi bỏ vào trong code của Web.config và chú ý đặt trên thẻ đóng </configuration>.

Bước 4: Thêm references từ CustomerManagement.WebApp đến CustomerManagement.Data.

Bước 5: Cài đặt NuGet Package EntityFramework trong CustomerManagement.WebApp.
Bước 6: Thực hiện Build Solution.
Tạo CRUD cho thực thể
Trong CustomerManagement.WebApp tạo controller mới (empty) tên là CustomersController.cs và thêm lần lượt code các phương thức sau và view sau:
Index() - Hiển thị danh sách:
private DataDbContext db = new DataDbContext();

public ActionResult Index()
{
    return View(db.Customers.ToList());
}
@model IEnumerable<CustomerManagement.Data.Entities.Customer>

@{
    ViewBag.Title = "Index";
}

<h2>Index</h2>

<p>
    @Html.ActionLink("Create New", "Create")
</p>
<table class="table">
    <tr>
        <th>
            @Html.DisplayNameFor(model => model.CustomerName)
        </th>
        <th>
            @Html.DisplayNameFor(model => model.ContactName)
        </th>
        <th>
            @Html.DisplayNameFor(model => model.Address)
        </th>
        <th>
            @Html.DisplayNameFor(model => model.City)
        </th>
        <th>
            @Html.DisplayNameFor(model => model.PostalCode)
        </th>
        <th>
            @Html.DisplayNameFor(model => model.Country)
        </th>
        <th></th>
    </tr>

@foreach (var item in Model) {
    <tr>
        <td>
            @Html.DisplayFor(modelItem => item.CustomerName)
        </td>
        <td>
            @Html.DisplayFor(modelItem => item.ContactName)
        </td>
        <td>
            @Html.DisplayFor(modelItem => item.Address)
        </td>
        <td>
            @Html.DisplayFor(modelItem => item.City)
        </td>
        <td>
            @Html.DisplayFor(modelItem => item.PostalCode)
        </td>
        <td>
            @Html.DisplayFor(modelItem => item.Country)
        </td>
        <td>
            @Html.ActionLink("Edit", "Edit", new { id=item.Id }) |
            @Html.ActionLink("Details", "Details", new { id=item.Id }) |
            @Html.ActionLink("Delete", "Delete", new { id=item.Id })
        </td>
    </tr>
}

</table>
Details() - Tạo trang hiển thị chi tiết:
Trong Controllers\CustomersController.cs, action method của trang Details sẽ như sau:
        public ActionResult Details(int? id)
        {
            if (id == null)
            {
                return new HttpStatusCodeResult(HttpStatusCode.BadRequest);
            }
            Customer customer = db.Customers.Find(id);
            if (customer == null)
            {
                return HttpNotFound();
            }
            return View(customer);
        }
Điều đáng chú ý ở đây là đoạn lệnh trên dùng phương thức Find() để lấy về một thực thể Customers tương ứng với khóa bạn truyền vào thông qua thuộc tính id. Giá trị của id đến từ tham số trên liên kết đến trang Details trên trang Index.
@model CustomerManagement.Data.Entities.Customer

@{
    ViewBag.Title = "Details";
}

<h2>Details</h2>

<div>
    <h4>Customer</h4>
    <hr />
    <dl class="dl-horizontal">
        <dt>
            @Html.DisplayNameFor(model => model.CustomerName)
        </dt>

        <dd>
            @Html.DisplayFor(model => model.CustomerName)
        </dd>

        <dt>
            @Html.DisplayNameFor(model => model.ContactName)
        </dt>

        <dd>
            @Html.DisplayFor(model => model.ContactName)
        </dd>

        <dt>
            @Html.DisplayNameFor(model => model.Address)
        </dt>

        <dd>
            @Html.DisplayFor(model => model.Address)
        </dd>

        <dt>
            @Html.DisplayNameFor(model => model.City)
        </dt>

        <dd>
            @Html.DisplayFor(model => model.City)
        </dd>

        <dt>
            @Html.DisplayNameFor(model => model.PostalCode)
        </dt>

        <dd>
            @Html.DisplayFor(model => model.PostalCode)
        </dd>

        <dt>
            @Html.DisplayNameFor(model => model.Country)
        </dt>

        <dd>
            @Html.DisplayFor(model => model.Country)
        </dd>

    </dl>
</div>
<p>
    @Html.ActionLink("Edit", "Edit", new { id = Model.Id }) |
    @Html.ActionLink("Back to List", "Index")
</p>
Create() - Tạo trang thêm mới :
Ở thao tác này, mình sẽ tạo ra 2 phương thức Create, với phương thức thứ nhất dùng để trả về view tương ứng là Views/Customers/Create.cshtml, và phương thức Create thứ hai dùng để lấy dữ liệu từ client do người dùng nhập vào để kiểm tra và lưu vào database.
        public ActionResult Create()
        {
            return View();
        }

        [HttpPost]
        [ValidateAntiForgeryToken]
        public ActionResult Create([Bind(Include = "Id,CustomerName,ContactName,Address,City,PostalCode,Country")] Customer customer)
        {
            if (ModelState.IsValid)
            {
                db.Customers.Add(customer);
                db.SaveChanges();
                return RedirectToAction("Index");
            }

            return View(customer);
        }
Tương ứng với view sau (Views/Customers/Create.cshtml):
@model CustomerManagement.Data.Entities.Customer

@{
    ViewBag.Title = "Create";
}

<h2>Create</h2>


@using (Html.BeginForm())
{
    @Html.AntiForgeryToken()

    <div class="form-horizontal">
        <h4>Customer</h4>
        <hr />
        @Html.ValidationSummary(true, "", new { @class = "text-danger" })
        <div class="form-group">
            @Html.LabelFor(model => model.CustomerName, htmlAttributes: new { @class = "control-label col-md-2" })
            <div class="col-md-10">
                @Html.EditorFor(model => model.CustomerName, new { htmlAttributes = new { @class = "form-control" } })
                @Html.ValidationMessageFor(model => model.CustomerName, "", new { @class = "text-danger" })
            </div>
        </div>

        <div class="form-group">
            @Html.LabelFor(model => model.ContactName, htmlAttributes: new { @class = "control-label col-md-2" })
            <div class="col-md-10">
                @Html.EditorFor(model => model.ContactName, new { htmlAttributes = new { @class = "form-control" } })
                @Html.ValidationMessageFor(model => model.ContactName, "", new { @class = "text-danger" })
            </div>
        </div>

        <div class="form-group">
            @Html.LabelFor(model => model.Address, htmlAttributes: new { @class = "control-label col-md-2" })
            <div class="col-md-10">
                @Html.EditorFor(model => model.Address, new { htmlAttributes = new { @class = "form-control" } })
                @Html.ValidationMessageFor(model => model.Address, "", new { @class = "text-danger" })
            </div>
        </div>

        <div class="form-group">
            @Html.LabelFor(model => model.City, htmlAttributes: new { @class = "control-label col-md-2" })
            <div class="col-md-10">
                @Html.EditorFor(model => model.City, new { htmlAttributes = new { @class = "form-control" } })
                @Html.ValidationMessageFor(model => model.City, "", new { @class = "text-danger" })
            </div>
        </div>

        <div class="form-group">
            @Html.LabelFor(model => model.PostalCode, htmlAttributes: new { @class = "control-label col-md-2" })
            <div class="col-md-10">
                @Html.EditorFor(model => model.PostalCode, new { htmlAttributes = new { @class = "form-control" } })
                @Html.ValidationMessageFor(model => model.PostalCode, "", new { @class = "text-danger" })
            </div>
        </div>

        <div class="form-group">
            @Html.LabelFor(model => model.Country, htmlAttributes: new { @class = "control-label col-md-2" })
            <div class="col-md-10">
                @Html.EditorFor(model => model.Country, new { htmlAttributes = new { @class = "form-control" } })
                @Html.ValidationMessageFor(model => model.Country, "", new { @class = "text-danger" })
            </div>
        </div>

        <div class="form-group">
            <div class="col-md-offset-2 col-md-10">
                <input type="submit" value="Create" class="btn btn-default" />
            </div>
        </div>
    </div>
}

<div>
    @Html.ActionLink("Back to List", "Index")
</div>

@section Scripts {
    @Scripts.Render("~/bundles/jqueryval")
}
Edit() - Tạo trang cập nhật/ chỉnh sửa:
Ở đây, bạn có 2 phương thức Update khác nhau theo kiểu quá tải hàm. Phương thức Update (int Id) dùng để dò tìm chỉ số id tương ứng với bảng trong database. Phương thức thứ hai dùng để lấy dữ liệu đã thay đổi bởi người dùng và cập nhật thông tin lại vào database.
        public ActionResult Edit(int? id)
        {
            if (id == null)
            {
                return new HttpStatusCodeResult(HttpStatusCode.BadRequest);
            }
            Customer customer = db.Customers.Find(id);
            if (customer == null)
            {
                return HttpNotFound();
            }
            return View(customer);
        }

        [HttpPost]
        [ValidateAntiForgeryToken]
        public ActionResult Edit([Bind(Include = "Id,CustomerName,ContactName,Address,City,PostalCode,Country")] Customer customer)
        {
            if (ModelState.IsValid)
            {
                db.Entry(customer).State = EntityState.Modified;
                db.SaveChanges();
                return RedirectToAction("Index");
            }
            return View(customer);
        }
Tương ứng với view sau (Views/Customers/Edit.cshtml):
@model CustomerManagement.Data.Entities.Customer

@{
    ViewBag.Title = "Edit";
}

<h2>Edit</h2>


@using (Html.BeginForm())
{
    @Html.AntiForgeryToken()

    <div class="form-horizontal">
        <h4>Customer</h4>
        <hr />
        @Html.ValidationSummary(true, "", new { @class = "text-danger" })
        @Html.HiddenFor(model => model.Id)

        <div class="form-group">
            @Html.LabelFor(model => model.CustomerName, htmlAttributes: new { @class = "control-label col-md-2" })
            <div class="col-md-10">
                @Html.EditorFor(model => model.CustomerName, new { htmlAttributes = new { @class = "form-control" } })
                @Html.ValidationMessageFor(model => model.CustomerName, "", new { @class = "text-danger" })
            </div>
        </div>

        <div class="form-group">
            @Html.LabelFor(model => model.ContactName, htmlAttributes: new { @class = "control-label col-md-2" })
            <div class="col-md-10">
                @Html.EditorFor(model => model.ContactName, new { htmlAttributes = new { @class = "form-control" } })
                @Html.ValidationMessageFor(model => model.ContactName, "", new { @class = "text-danger" })
            </div>
        </div>

        <div class="form-group">
            @Html.LabelFor(model => model.Address, htmlAttributes: new { @class = "control-label col-md-2" })
            <div class="col-md-10">
                @Html.EditorFor(model => model.Address, new { htmlAttributes = new { @class = "form-control" } })
                @Html.ValidationMessageFor(model => model.Address, "", new { @class = "text-danger" })
            </div>
        </div>

        <div class="form-group">
            @Html.LabelFor(model => model.City, htmlAttributes: new { @class = "control-label col-md-2" })
            <div class="col-md-10">
                @Html.EditorFor(model => model.City, new { htmlAttributes = new { @class = "form-control" } })
                @Html.ValidationMessageFor(model => model.City, "", new { @class = "text-danger" })
            </div>
        </div>

        <div class="form-group">
            @Html.LabelFor(model => model.PostalCode, htmlAttributes: new { @class = "control-label col-md-2" })
            <div class="col-md-10">
                @Html.EditorFor(model => model.PostalCode, new { htmlAttributes = new { @class = "form-control" } })
                @Html.ValidationMessageFor(model => model.PostalCode, "", new { @class = "text-danger" })
            </div>
        </div>

        <div class="form-group">
            @Html.LabelFor(model => model.Country, htmlAttributes: new { @class = "control-label col-md-2" })
            <div class="col-md-10">
                @Html.EditorFor(model => model.Country, new { htmlAttributes = new { @class = "form-control" } })
                @Html.ValidationMessageFor(model => model.Country, "", new { @class = "text-danger" })
            </div>
        </div>

        <div class="form-group">
            <div class="col-md-offset-2 col-md-10">
                <input type="submit" value="Save" class="btn btn-default" />
            </div>
        </div>
    </div>
}

<div>
    @Html.ActionLink("Back to List", "Index")
</div>

@section Scripts {
    @Scripts.Render("~/bundles/jqueryval")
}
Delete() - Tạo trang xóa dữ liệu:
Bây giờ, chúng ta ta chuyển sang tìm hiểu phương thức Delete cũng như View của nó. Đúng như tên gọi, Delete (xóa) là phương thức dễ hiểu nhất, vì thông thường “phá dễ hơn làm”. Nếu bạn đã học về cơ sở dữ liệu và có một sự quan sát tinh tế về thiết kế Web động thì thao tác xóa ở Web thường xóa theo chỉ số ID (hay chỉ số khóa) chứ không phải theo bất cứ trường nào khác.
Lưu ý xóa theo chỉ số ID với thiết kế Web là nguyên tắc chung áp dụng cho tất cả các ngôn ngữ Web (PHP, Perl, JSP) chứ không riêng gì ASP.NET MVC.
        public ActionResult Delete(int? id)
        {
            if (id == null)
            {
                return new HttpStatusCodeResult(HttpStatusCode.BadRequest);
            }
            Customer customer = db.Customers.Find(id);
            if (customer == null)
            {
                return HttpNotFound();
            }
            return View(customer);
        }

        [HttpPost, ActionName("Delete")]
        [ValidateAntiForgeryToken]
        public ActionResult DeleteConfirmed(int id)
        {
            Customer customer = db.Customers.Find(id);
            db.Customers.Remove(customer);
            db.SaveChanges();
            return RedirectToAction("Index");
        }
Tương ứng với view sau (Views/Customers/Delete.cshtml):
@model CustomerManagement.Data.Entities.Customer

@{
    ViewBag.Title = "Delete";
}

<h2>Delete</h2>

<h3>Are you sure you want to delete this?</h3>
<div>
    <h4>Customer</h4>
    <hr />
    <dl class="dl-horizontal">
        <dt>
            @Html.DisplayNameFor(model => model.CustomerName)
        </dt>

        <dd>
            @Html.DisplayFor(model => model.CustomerName)
        </dd>

        <dt>
            @Html.DisplayNameFor(model => model.ContactName)
        </dt>

        <dd>
            @Html.DisplayFor(model => model.ContactName)
        </dd>

        <dt>
            @Html.DisplayNameFor(model => model.Address)
        </dt>

        <dd>
            @Html.DisplayFor(model => model.Address)
        </dd>

        <dt>
            @Html.DisplayNameFor(model => model.City)
        </dt>

        <dd>
            @Html.DisplayFor(model => model.City)
        </dd>

        <dt>
            @Html.DisplayNameFor(model => model.PostalCode)
        </dt>

        <dd>
            @Html.DisplayFor(model => model.PostalCode)
        </dd>

        <dt>
            @Html.DisplayNameFor(model => model.Country)
        </dt>

        <dd>
            @Html.DisplayFor(model => model.Country)
        </dd>

    </dl>

    @using (Html.BeginForm()) {
        @Html.AntiForgeryToken()

        <div class="form-actions no-color">
            <input type="submit" value="Delete" class="btn btn-default" /> |
            @Html.ActionLink("Back to List", "Index")
        </div>
    }
</div>
Sắp xếp (sorting dữ liệu)
Theo như đề bài, tiếp tục mình sẽ hướng dẫn các bạn code sắp xếp (sorting) dữ liệu theo tất các field Id, CustomerName, ContactName, Address, City, PostalCode, Country trong thực thể Customer.
Chức năng này chúng ta chỉ làm việc trong phương thức và view của Index, vì vậy trước tiên các bạn vào Controllers/CustomersController.cs và update code trong phương thức Index như sau:
public ActionResult Index(string sortOrder)
        {
            ViewBag.Id_NameSortParm = String.IsNullOrEmpty(sortOrder) ? "ID_desc" : "";
            ViewBag.Cus_NameSortParm = String.IsNullOrEmpty(sortOrder) ? "customername_desc" : "";
            ViewBag.Con_NameSortParm = String.IsNullOrEmpty(sortOrder) ? "contactname_desc" : "";
            ViewBag.Add_NameSortParm = String.IsNullOrEmpty(sortOrder) ? "address_desc" : "";
            ViewBag.City_NameSortParm = String.IsNullOrEmpty(sortOrder) ? "city_desc" : "";
            ViewBag.Code_NameSortParm = String.IsNullOrEmpty(sortOrder) ? "code_desc" : "";
            ViewBag.Country_NameSortParm = String.IsNullOrEmpty(sortOrder) ? "country_desc" : "";

            var entity = from s in db.Customers
                         select s;

            switch (sortOrder)
            {
                case "ID_desc":
                    entity = db.Customers.OrderByDescending(s => s.Id);
                    break;
                case "customername_desc":
                    entity = db.Customers.OrderByDescending(s => s.CustomerName);
                    break;
                case "contactname_desc":
                    entity = db.Customers.OrderByDescending(s => s.ContactName);
                    break;
                case "address_desc":
                    entity = db.Customers.OrderByDescending(s => s.Address);
                    break;
                case "code_desc":
                    entity = db.Customers.OrderByDescending(s => s.PostalCode);
                    break;
                case "country_desc":
                    entity = db.Customers.OrderByDescending(s => s.PostalCode);
                    break;
                case "city_desc":
                    entity = db.Customers.OrderByDescending(s => s.Country);
                    break;
                default:
                    entity = db.Customers.OrderBy(s => s.Id);
                    break;
            }
            return View(entity.ToList());
        }
Phương thức trên nhận vào một tham số sortOrder từ chuỗi truy vấn trong URL, và giá trị mặc định là sắp xếp tăng dẫn theo Id. Ta kết hợp dùng switch.. case.., để khi ta nhấn vào liên kết tiêu đề cột, giá trị sortOrder sẽ sắp xếp phù hợp.
Vậy tất nhiên view trong Views/Customers/Index.cshtml sẽ thay đổi như sau:
@model IEnumerable<CustomerManagement.Data.Entities.Customer>
@{
    ViewBag.Title = "Index";
}
<h2>Index</h2>
<p>
    @Html.ActionLink("Create New", "Create")
</p>
<table class="table">
    <tr>

        <th>
            @Html.ActionLink("Id", "Index", new { sortOrder = ViewBag.Id_NameSortParm })
        </th>
        <th>
            @Html.ActionLink("Customer Name", "Index", new { sortOrder = ViewBag.Cus_NameSortParm })
        </th>
        <th>
            @Html.ActionLink("Contact Name", "Index", new { sortOrder = ViewBag.Con_NameSortParm })
        </th>
        <th>
            @Html.ActionLink("Address", "Index", new { sortOrder = ViewBag.Add_NameSortParm })
        </th>
        <th>
            @Html.ActionLink("City", "Index", new { sortOrder = ViewBag.City_NameSortParm })
        </th>
        <th>
            @Html.ActionLink("Postal Code", "Index", new { sortOrder = ViewBag.Code_NameSortParm })
        </th>
        <th>
            @Html.ActionLink("Country", "Index", new { sortOrder = ViewBag.Country_NameSortParm })
        </th>
        <th></th>
    </tr>

@foreach (var item in Model) {
<tr>
    <td>
        @Html.DisplayFor(modelItem => item.Id)
    </td>
    <td>
        @Html.DisplayFor(modelItem => item.CustomerName)
    </td>
    <td>
        @Html.DisplayFor(modelItem => item.ContactName)
    </td>
    <td>
        @Html.DisplayFor(modelItem => item.Address)
    </td>
    <td>
        @Html.DisplayFor(modelItem => item.City)
    </td>
    <td>
        @Html.DisplayFor(modelItem => item.PostalCode)
    </td>
    <td>
        @Html.DisplayFor(modelItem => item.Country)
    </td>
    <td>
        @Html.ActionLink("Edit", "Edit", new { id = item.Id }) |
        @Html.ActionLink("Details", "Details", new { id = item.Id }) |
        @Html.ActionLink("Delete", "Delete", new { id = item.Id })
    </td>
</tr>
}

</table>
Kết quả mong muốn như sau:
Tìm kiếm dữ liệu
Và chức năng tiếp theo đây là tìm kiếm dữ liệu, cụ thể là tìm kiếm theo Id và Customer Name. Chức năng này hay và có ích khi ta tổ chức dữ liệu lớn, nhưng bây giờ chúng ta mô phỏng để hiểu hơn về nó nhé.
Chức năng này chúng ta chỉ làm việc trong thức và view của index nên ta update code trong index lần lượt như sau:
        public ActionResult Index(string searchById, string searchByName, string sortOrder)
        {
            ViewBag.Id_NameSortParm = String.IsNullOrEmpty(sortOrder) ? "ID_desc" : "";
            ViewBag.Cus_NameSortParm = String.IsNullOrEmpty(sortOrder) ? "customername_desc" : "";
            ViewBag.Con_NameSortParm = String.IsNullOrEmpty(sortOrder) ? "contactname_desc" : "";
            ViewBag.Add_NameSortParm = String.IsNullOrEmpty(sortOrder) ? "address_desc" : "";
            ViewBag.City_NameSortParm = String.IsNullOrEmpty(sortOrder) ? "city_desc" : "";
            ViewBag.Code_NameSortParm = String.IsNullOrEmpty(sortOrder) ? "code_desc" : "";
            ViewBag.Country_NameSortParm = String.IsNullOrEmpty(sortOrder) ? "country_desc" : "";

            var entity = from s in db.Customers
                         select s;

            //Tìm theo ID
            if (!String.IsNullOrEmpty(searchById))
            {
                entity = db.Customers.Where(s => s.Id.ToString().Contains(searchById));
            }

            // Tìm theo CustomerName
            if (!String.IsNullOrEmpty(searchByName))
            {
                entity = db.Customers.Where(s => s.CustomerName.Contains(searchByName));
            }

            switch (sortOrder)
            {
                case "ID_desc":
                    entity = db.Customers.OrderByDescending(s => s.Id);
                    break;
                case "customername_desc":
                    entity = db.Customers.OrderByDescending(s => s.CustomerName);
                    break;
                case "contactname_desc":
                    entity = db.Customers.OrderByDescending(s => s.ContactName);
                    break;
                case "address_desc":
                    entity = db.Customers.OrderByDescending(s => s.Address);
                    break;
                case "code_desc":
                    entity = db.Customers.OrderByDescending(s => s.PostalCode);
                    break;
                case "country_desc":
                    entity = db.Customers.OrderByDescending(s => s.PostalCode);
                    break;
                case "city_desc":
                    entity = db.Customers.OrderByDescending(s => s.Country);
                    break;
                default:
                    entity = db.Customers.OrderBy(s => s.Id);
                    break;
            }

            return View(entity.ToList());
        }
Trong phương thức trên ta sử dụng hàm contains để kiểm tra sử tồn tại của chuỗi hay xác định khi nào 1 tập dữ liệu chứa 1 phần tử nào đó. Cụ thể là kiểm tra Id hoặc CustomerName có chứa tham số đầu vào khi người dùng nhập hay không, rồi hiển thị ra một list.
Khi searchById, mình có dùng hàm ToString(), vì bản chất của Id ta sử dụng kiểu dữ liệu là int, vì thế ta cần ép kiểu sang string để thực thi tiếp câu lệnh.
@model IEnumerable<CustomerManagement.Data.Entities.Customer>
@{
    ViewBag.Title = "Index";
}
<h2>Index</h2>
<p>
    @Html.ActionLink("Create New", "Create")
</p>

<div class="row mb-2" style="display: initial;">
    <div class="col-md-2"></div>
    <div class="col-md-5" style="display: flex; width: auto;">
        <form class="form-inline" style="margin-right: 10px;">
            <div class="form-group mx-sm-3 mb-2">
                <input type="text" class="form-control" placeholder="searchById" name="searchById">
            </div>
            <button type="submit" class="btn btn-primary mb-2 mr-2">Filter</button>
        </form>
        <form class="form-inline">
            <div class="form-group mx-sm-3 mb-2">
                <input type="text" class="form-control" placeholder="searchByName" name="searchByName">
            </div>
            <button type="submit" class="btn btn-success mb-2">Filter</button>
        </form>
    </div>
</div>


<table class="table">
    <tr>
        <th>
            @Html.ActionLink("Id ↓↑", "Index", new { sortOrder = ViewBag.Id_NameSortParm })
        </th>
        <th>
            @Html.ActionLink("Customer Name ↓↑", "Index", new { sortOrder = ViewBag.Cus_NameSortParm })
        </th>
        <th>
            @Html.ActionLink("Contact Name ↓↑", "Index", new { sortOrder = ViewBag.Con_NameSortParm })
        </th>
        <th>
            @Html.ActionLink("Address ↓↑", "Index", new { sortOrder = ViewBag.Add_NameSortParm })
        </th>
        <th>
            @Html.ActionLink("City ↓↑", "Index", new { sortOrder = ViewBag.City_NameSortParm })
        </th>
        <th>
            @Html.ActionLink("Postal Code ↓↑", "Index", new { sortOrder = ViewBag.Code_NameSortParm })
        </th>
        <th>
            @Html.ActionLink("Country ↓↑", "Index", new { sortOrder = ViewBag.Country_NameSortParm })
        </th>
        <th></th>
    </tr>

@foreach (var item in Model) {
<tr>
    <td>
        @Html.DisplayFor(modelItem => item.Id)
    </td>
    <td>
        @Html.DisplayFor(modelItem => item.CustomerName)
    </td>
    <td>
        @Html.DisplayFor(modelItem => item.ContactName)
    </td>
    <td>
        @Html.DisplayFor(modelItem => item.Address)
    </td>
    <td>
        @Html.DisplayFor(modelItem => item.City)
    </td>
    <td>
        @Html.DisplayFor(modelItem => item.PostalCode)
    </td>
    <td>
        @Html.DisplayFor(modelItem => item.Country)
    </td>
    <td>
        @Html.ActionLink("Edit", "Edit", new { id = item.Id }) |
        @Html.ActionLink("Details", "Details", new { id = item.Id }) |
        @Html.ActionLink("Delete", "Delete", new { id = item.Id })
    </td>
</tr>
}

</table>
Kết quả mong muốn:

Tìm Max, Min
Để hiểu rõ hơn về hàm max, min thì ví dụ này ta sẽ trực tiếp tìm max, min theo Id, tức là chỉ rõ số Id lớn nhất, nhỏ nhất. Phần này ta cũng chỉ làm việc trong thức và view của index nên ta update code trong index lần lượt như sau:
public ActionResult Index(string searchById, string searchByName, string sortOrder)
        {
            ViewBag.Id_NameSortParm = String.IsNullOrEmpty(sortOrder) ? "ID_desc" : "";
            ViewBag.Cus_NameSortParm = String.IsNullOrEmpty(sortOrder) ? "customername_desc" : "";
            ViewBag.Con_NameSortParm = String.IsNullOrEmpty(sortOrder) ? "contactname_desc" : "";
            ViewBag.Add_NameSortParm = String.IsNullOrEmpty(sortOrder) ? "address_desc" : "";
            ViewBag.City_NameSortParm = String.IsNullOrEmpty(sortOrder) ? "city_desc" : "";
            ViewBag.Code_NameSortParm = String.IsNullOrEmpty(sortOrder) ? "code_desc" : "";
            ViewBag.Country_NameSortParm = String.IsNullOrEmpty(sortOrder) ? "country_desc" : "";

            var entity = from s in db.Customers
                         select s;
            // Max min theo Id
            ViewBag.CustomerIdMax = db.Customers.Max(p => p.Id);
            ViewBag.CustomerIdMin = db.Customers.Min(p => p.Id);

            //Tìm theo ID
            if (!String.IsNullOrEmpty(searchById))
            {
                entity = db.Customers.Where(s => s.Id.ToString().Contains(searchById));
            }

            // Tìm theo CustomerName
            if (!String.IsNullOrEmpty(searchByName))
            {
                entity = db.Customers.Where(s => s.CustomerName.Contains(searchByName));
            }

            switch (sortOrder)
            {
                case "ID_desc":
                    entity = db.Customers.OrderByDescending(s => s.Id);
                    break;
                case "customername_desc":
                    entity = db.Customers.OrderByDescending(s => s.CustomerName);
                    break;
                case "contactname_desc":
                    entity = db.Customers.OrderByDescending(s => s.ContactName);
                    break;
                case "address_desc":
                    entity = db.Customers.OrderByDescending(s => s.Address);
                    break;
                case "code_desc":
                    entity = db.Customers.OrderByDescending(s => s.PostalCode);
                    break;
                case "country_desc":
                    entity = db.Customers.OrderByDescending(s => s.PostalCode);
                    break;
                case "city_desc":
                    entity = db.Customers.OrderByDescending(s => s.Country);
                    break;
                default:
                    entity = db.Customers.OrderBy(s => s.Id);
                    break;
            }

            return View(entity.ToList());
        }
Như ta thấy, tìm kiếm giá trị max, min không cần tham số đầu vào, và ta dùng hàm Max, Min để tìm rất nhanh chóng và đơn giản.
@model IEnumerable<CustomerManagement.Data.Entities.Customer>
@{
    ViewBag.Title = "Index";
}
<h2>Index</h2>
<p>
    @Html.ActionLink("Create New", "Create")
</p>
<div class="row mb-2" style="display: initial;">
    <div class="col-md-2">
        Id max is @ViewBag.CustomerIdMax and min is @ViewBag.CustomerIdMin
    </div>
    <div class="col-md-5" style="display: flex; width: auto;">
        <form class="form-inline" style="margin-right: 10px;">
            <div class="form-group mx-sm-3 mb-2">
                <input type="text" class="form-control" placeholder="searchById" name="searchById">
            </div>
            <button type="submit" class="btn btn-primary mb-2 mr-2">Filter</button>
        </form>
        <form class="form-inline">
            <div class="form-group mx-sm-3 mb-2">
                <input type="text" class="form-control" placeholder="searchByName" name="searchByName">
            </div>
            <button type="submit" class="btn btn-success mb-2">Filter</button>
        </form>
    </div>
</div>


<table class="table">
    <tr>
        <th>
            @Html.ActionLink("Id ↓↑", "Index", new { sortOrder = ViewBag.Id_NameSortParm })
        </th>
        <th>
            @Html.ActionLink("Customer Name ↓↑", "Index", new { sortOrder = ViewBag.Cus_NameSortParm })
        </th>
        <th>
            @Html.ActionLink("Contact Name ↓↑", "Index", new { sortOrder = ViewBag.Con_NameSortParm })
        </th>
        <th>
            @Html.ActionLink("Address ↓↑", "Index", new { sortOrder = ViewBag.Add_NameSortParm })
        </th>
        <th>
            @Html.ActionLink("City ↓↑", "Index", new { sortOrder = ViewBag.City_NameSortParm })
        </th>
        <th>
            @Html.ActionLink("Postal Code ↓↑", "Index", new { sortOrder = ViewBag.Code_NameSortParm })
        </th>
        <th>
            @Html.ActionLink("Country ↓↑", "Index", new { sortOrder = ViewBag.Country_NameSortParm })
        </th>
        <th></th>
    </tr>

@foreach (var item in Model) {
<tr>
    <td>
        @Html.DisplayFor(modelItem => item.Id)
    </td>
    <td>
        @Html.DisplayFor(modelItem => item.CustomerName)
    </td>
    <td>
        @Html.DisplayFor(modelItem => item.ContactName)
    </td>
    <td>
        @Html.DisplayFor(modelItem => item.Address)
    </td>
    <td>
        @Html.DisplayFor(modelItem => item.City)
    </td>
    <td>
        @Html.DisplayFor(modelItem => item.PostalCode)
    </td>
    <td>
        @Html.DisplayFor(modelItem => item.Country)
    </td>
    <td>
        @Html.ActionLink("Edit", "Edit", new { id = item.Id }) |
        @Html.ActionLink("Details", "Details", new { id = item.Id }) |
        @Html.ActionLink("Delete", "Delete", new { id = item.Id })
    </td>
</tr>
}

</table>

Xuất dữ liệu bảng ra file Excel
Thêm một chức năng nữa khá là hay, trên blog mình cũng đã hướng dẫn trước đó, sẽ thật tiện lợi khi ta xuất các dữ liệu trong bảng ra file Excel phải không nào.
Trước tiên, trong CustomerManagement.WebApp ta cần cài đặt NugetPackage sau:
- EPPlus
Tiếp theo trong Controllers/CustomersController.cs ta thêm mới phương thức sau:
       public ActionResult ExportToExcel()
        {
            var doctors = from m in db.Customers
                          select m;

            byte[] fileContents;
            ExcelPackage.LicenseContext = LicenseContext.NonCommercial;
            ExcelPackage Ep = new ExcelPackage();
            ExcelWorksheet Sheet = Ep.Workbook.Worksheets.Add("Customer Management");
            Sheet.Cells["A1"].Value = "Id";
            Sheet.Cells["B1"].Value = "CustomerName";
            Sheet.Cells["C1"].Value = "ContactName";
            Sheet.Cells["D1"].Value = "Address";
            Sheet.Cells["E1"].Value = "City";
            Sheet.Cells["F1"].Value = "PostalCode";
            Sheet.Cells["G1"].Value = "Country";

            int row = 2;
            foreach (var item in doctors)
            {
                Sheet.Cells[string.Format("A{0}", row)].Value = item.Id;
                Sheet.Cells[string.Format("B{0}", row)].Value = item.CustomerName;
                Sheet.Cells[string.Format("C{0}", row)].Value = item.ContactName;
                Sheet.Cells[string.Format("D{0}", row)].Value = item.Address;
                Sheet.Cells[string.Format("E{0}", row)].Value = item.City;
                Sheet.Cells[string.Format("F{0}", row)].Value = item.PostalCode;
                Sheet.Cells[string.Format("G{0}", row)].Value = item.Country;
                row++;
            }


            Sheet.Cells["A:AZ"].AutoFitColumns();
            Response.Clear();
            Response.ContentType = "application/vnd.openxmlformats-officedocument.spreadsheetml.sheet";
            fileContents = Ep.GetAsByteArray();

            if (fileContents == null || fileContents.Length == 0)
            {
                return HttpNotFound();
            }

            return File(
                fileContents: fileContents,
                contentType: "application/vnd.openxmlformats-officedocument.spreadsheetml.sheet",
                fileDownloadName: "List-Customer.xlsx"
            );
        }
Và tiếp các bạn cần hiển thị nút Download ở nơi bạn muốn hiển thị trong view Index.cshtml như sau:
<div class="text-right" style="overflow: hidden; padding: 1px 0px 0px 0px;">
    <button type="button" class="btn btn-success" onclick="location.href='@Url.Action("ExportToExcel", "Customers")'">Export To Excel</button>
</div>


Lời kết
Bài tập này cơ bản vận dụng được các chức năng khi thao tác với data table, có thể dùng khi làm project lớn. Mọi thắc mắc comment ở dưới, hoặc liên hệ mình.
Mong bài viết hữu ích với bạn, chúc bạn thành công.
By Hiếu Quốc

Email: quochieuu@gmail.com
Facebook: fb.com/hieuqdev
CV: cv.quochieu.com
Post a Comment
Post a Comment